Tuesday, April 15, 2014

STEAMPUNK

Here are two of my newest Steamed Ladies for those who do not go to my Facebook page.


HEAD

The face gets roughed-in while attached to the body in this case because the support rod for the figure   emerges from the skull.


Conditioned clay is applied to the skull to a thickness of about 1/8" thick. The eye sockets are kept open at this point and the main features are roughed-in. 


The features are refined slightly as the upper lip is attached.


The lower lip is attached, features are refined a bit more and beads are dropped into the eye sockets.


Using photos, the features are shaped and refined. You will get a better result by working all the features at once rather than concentrating on refining just one feature at a time.


Once the face is final shaped, the teeth are shaped in the mouth.
Have a great day of sculpting!
Mark


Sunday, April 13, 2014

BODY WORK

For this set of observations, I will be using a different figure because I sort of jumped ahead. So  here it is.

The figure is covered with a layer of conditioned clay about 1/4" thick.


The clay is applied in large pieces and compressed onto the armature. 


A central dividing line is laid into the figure on both the front and the back.


The torso is divided starting with a line from shoulder to shoulder which will become the collar bone. The second mark is one head height down from the collarbone. This will be about the location of the  base of the sternum. The next mark will be a head height lower and will denote the waist. The last head height will end at the front of the crotch ( the back side will be slightly lower).


Depressions are made from the sternum to the side of the body even with the waist mark. This is the bottom of the rib cage. A depression is created from the crotch to the side of the body slightly lower than the sternum/hip marker. This is the leg fold.


The armpit is formed by pressing below the armature wire for the arm.  This runs from the armpit to the small of the back along the latisimus muscles in the back and from the armpit toward the sternum in the front along the base of the pectoral muscles.


The back is completed by depressing a line down the spine and between the buttocks. This depression will stop below the small of the back then start again after it passes over the sacrum or the base of the spine.


The main fat, muscle, and bone structures are defined with the sculpting tool.


Next we will do the smoothing of the muscles after adding the head.
Thanks for joining me, have a great sculpting day!
Mark


Wednesday, April 9, 2014

ARMATURE CONSTRUCTION

As you can see, the design of the piece is very simple: the armature for the figure need only support the figure's weight just as if it was sitting directly on a base. All we have done is add an additional support to this basic armature to raise the piece of the plane of the base.


The two sides of the armature are shaped and cut to match the layout. In addition, a longer piece of wire is added to the group to support the prebaked polymer skull.


All the parts of the armature are ready to assemble. I have switched from a steel rod to a brass rod for the support post and added the brass tube with a flattened end which will be installed in the spine of the figure.


The two sides of the armature are foil taped together. (These can be soldered if you wish however, the weight of the figure is less than one pound so that really isn't needed)


The body armature is shaped to the final shape of the figure with arch in the spine and twist to the torso before the support is added.


The brass tube is attached to the spine with the open end protruding from the armature far enough to allow for the depth of the finished clay.


The armature is padded with foil and taped to keep the clay clean.


Clay is conditioned and applied to the armature.
Next we will sculpt the figure.
Have a great day of sculpting!
Mark


Monday, January 21, 2013

FLESHING OUT

The first mermaid is now fleshed out and gotten ready to fit onto the side of the boat.


Tail is shaped and scales carved into the clay.


The tail is colored with embossing powders on the raw clay.

Next time: finish the first mermaid and start the second.
Have a great sculpting day!
Mark


Wednesday, January 2, 2013

SAILOR and MERMAIDS

Welcome to 2013!
I want to thank you all for staying tuned in while I got the gallery up and running. Now back to work on sculpting.
The first piece I will post this year  was suggested by The Mertailor https://themertailor.com/store/
It will be a re-creation of a scene from a well known movie but I will be altering it as not to infringe upon copyrights
 Because the sculpture will be very complex, I will need to draw it out to get the armature correct. 
Here are the things to be considered during the design stage:
1. How will the mermaids touch the base?
2. How will the boat be suspended?
3. How will the third mermaid  be supported or attached     to the set? 
4. What will the base material be?


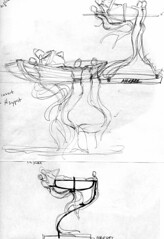
This sketch shows what the final piece should look like.
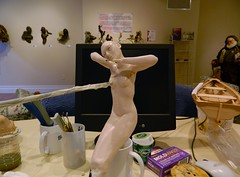
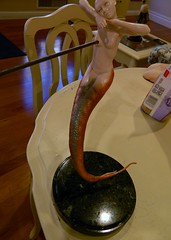
There will be two mermaids leaning on the gunwales of the dinghy. They will be the supports for the rest of the sculpture. Their tales will touch on a base of green marble which will have enough weight to keep this from tipping over. The boat will be supported by rods in the armatures of these two lovely ladies. The boat will then support the last mermaid and the sailor will sit in the boat. 
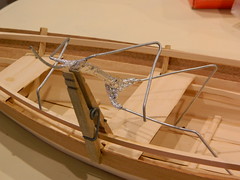
I start this piece by finding a wooden dinghy model which has the look I want. A few hours (and quite a few dollars) later, I have the majority of the model built so I can make the armatures for the figures to the proper scale. Note that parts of the boat are not in place yet since the supports for the boat and the last mermaids will need to be shaped and installed under the gunwales before it is finished.


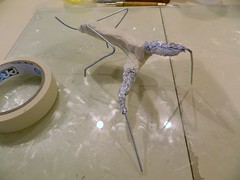
The armature is made following my basic armature layout which can be found in an earlier post on the blog. The armature is three 14 gauge wire pieces which are wrapped together with foil tape.


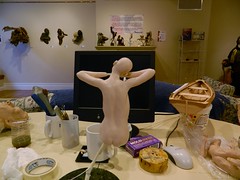
The armature is padded with foil to bulk out the armature so the over laying clay will be about 3/8" thick.
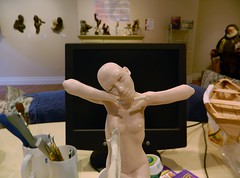
The foil and wire are then covered with masking tape to keep oxidation from being transferred to the clay.


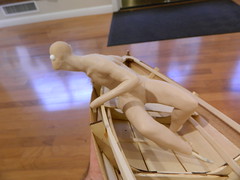
Clay is applied to the armature and detailed. The sailor will just sit in the boat so there is no need to add set pins to tie him into it.


More to follow. Have a great clay day!
Mark

Monday, August 27, 2012