Wednesday, March 30, 2011

Adding interest to the basic sculpt.

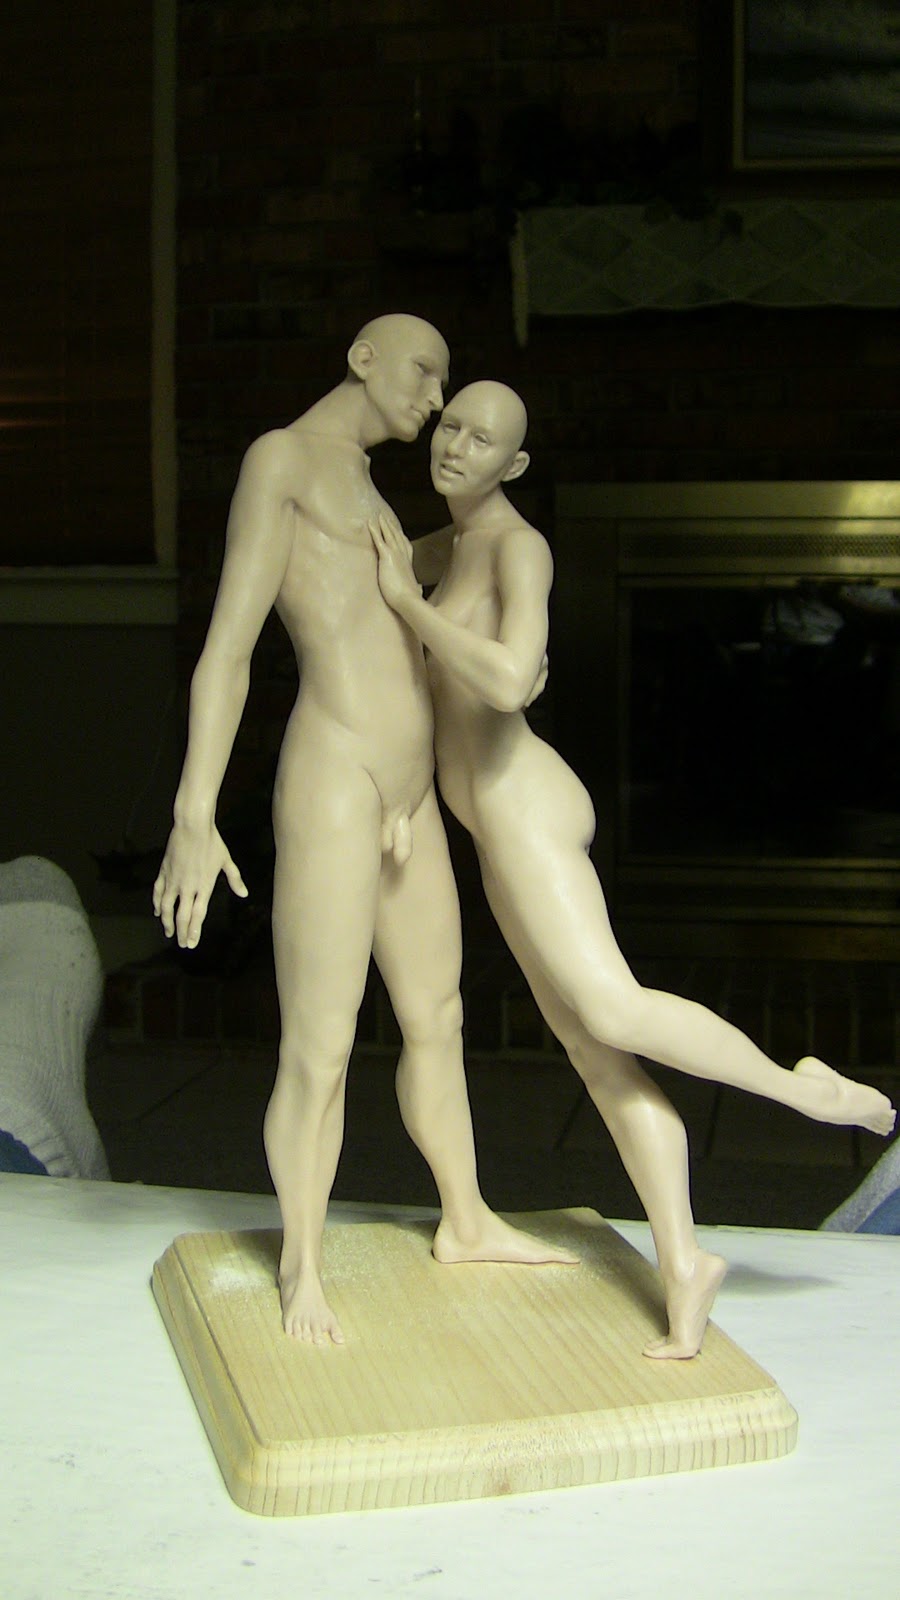
As I look at these figures, I realize just how boring they are. So lets look at a few ways to make them a bit more interesting now that they are fully sculpted and the damage is done.
Here they are, the basic figures which looked so good to me as I was creating them now look so plain. As the dressing is finished, you will notice that the pictures make his neck and arm look longer. Part of this is the camera and part of this is just that I made him a little long.


 Sorry, bad picture. To start the process of adding more interest, I want to age the clothing slightly. The right leg has been sanded to add wear spots to the folds of the leather pants and worn spots on the shoes. The left leg is still brand new.

A wash of Raw Umber and Retarder/Extender is used to add "dirt" to the pants and boots. this is only on the left side right now to show contrast. The Raw Umber mix is worked into the creases and folds to add shadow and accumulated dirt to the seams. Once they are dry, I will sand the high spots again and touch up with the wash in a series of layers until the clothing has a used look.


Before I proceed, let explain the thought process here. I want to add interest to the piece while shifting focus from the issues I see in the figures; namely the seemingly long neck and arm of the male. I thought about just adding a collar to the shirt but the piece was still boring so I came up with the idea of using a cape. I don't want to cover her with a cape as well so my thought is to use his cape to encircle her as a form of protection from a sudden spring rain. The cape flowing in the wind with a bit of rain or sleet would add some interest to the piece and allow me to shift the eye away from the issues I see.
The cape is made of a coarse cotton fabric from a pair of worn pants. I have sewn a hood onto the top and added a very roughly sewn hem with a pocket on the edge.
The cape is roughed up with a coarse sanding pad to add wear to the fold and hem.
The same Umber wash is used to dirty the hemline.
Finally, a wire is inserted into the pocket of the hem.
The finished cloak can now be posed around the figures.


 The figures are separated and the robe is pinned in place so I can figure out how to get the figures back together with the robe on and so I can shape the folds as I want.
 I work my way around the piece making adjustments as I go.
The female is put in place and the posing of the cloth continues.
 Now, I have the pose so I start gluing parts of the cloak together and pinning and clamping them until the glue sets.

The finished pose of the cloak.
 And from the rear.


The last step is to add some sleet/rain to the figures. I want the start of a spring shower so I used Gallery Glass and a tooth brush to spatter the figures from behind and above the male. This image shows the heavier deposit of "rain" on the cloak where his head and her arm (under the cloth) keep the cloak in place. This is where the rain will soak in first rather than the entire cloak. Her face and hair also get slightly spattered with the Gallery Glass so she ends up with beads of rain in her hair.

If you look closely, you can see the pattern of wet spots on the silk dress where it is not sheltered by his cloak.
 The cloak hugs his figure as the wind whips it around them both.

Thanks for joining me today.
Have a great day.
Mark

Tuesday, March 29, 2011

Dressed male

Took some time last night to dress the male figure.
 He has a silk shirt, leather pants and shoes.
Last bit of work will be to age the materials a bit and add any accessories.
Thanks for looking, have a great day.

Monday, March 28, 2011

Two figure sculpt update

Sorry for not getting to post as often as I would like. Hope to get back to sculpting and posting more in the near future. In the mean time, here is the ongoing work on the basic sculpts.
 She has been dressed in a roman styled garment which is modeled after one from the movie King Arthur.
The dress is recycled silk with and edging that has small eyelets sewn into it.

 The empire waist is accented with a length of ornamental trim which is slipped through a pewter buckle. The ends are finished in red wooden and white and blue mottled glass beads.

The back has a set of panels sewn in to add fullness. They are a little flattened right now but will be fluffed a bit once he is in place.


Here is a close up of the finished face and details.


The shoulder ties are made from two metal head pins which are interlocked and hooked through an eyelet at the shoulder seam of the dress.

More on the male next time. Have a great day!
Mark

Monday, March 21, 2011

Update: simple armaturen in use (contains artistic nudity)

I had a few folks ask about seeing updates on this piece so here they are painted and with hair and eyes.


Sunday, March 20, 2011

Enough about the simple armature already1

Working on these two figures and decided that I would put them on the blog as an example of using the simple armature.
 Each of these figures uses the simple wire armature laid out in previous blogs. The armatures have tubes on the wire in the legs only.
The wires in the arms stop just inside the palm of the hand so the figures can be separated from each other.
Once the figures were sculpted as separate pieces, they were lightly dusted with baby powder so they could be worked together without the clay fusing them to each other.
The hands were added after the figures were intertwined.
His arm has been raised to her elbow, I'll show you that later.
Have a great day!

Monday, March 14, 2011

Motion (physics), any movement or change in position or place

Before we move onto more complex and time consuming armatures I though we should look at what we can do with the basic armature.  Most of us will never need to use another more difficult armature than the basic armature we covered in past blogs.
Lets take a look then at how we can use that  armature and still get some interesting results.
All of these design concepts come back to adding movement to our work in order to bring the piece to life for our viewers.

IDEA ONE:  Contrapposto is an Italian term used to describe a human figure standing with most of its weight on one foot so that its shoulders and arms twist off-axis from the hips and legs. This gives the figure a more dynamic pose and makes the viewer want to follow the spiral of the body to look around the piece. In this way you engage the viewer and encourage them to study the flow of the piece more closely. "Madonna of the Fields"
In this case the weight of the figure is shifted to one foot, the torso has a slight twist to it which is exaggerated by the flow of the clothing. The hips and shoulders are slightly twisted out of alignment with each other and the head is turned as if she is looking away. The general flow of the piece is a spiral which (I hope) makes the viewer want to follow the curve around the figure.The result is a relaxed, natural pose. In this way, we can add movement to a figure even if it is standing perfectly still.


IDEA TWO: Tension (physics), a force related to the stretching of an object (the opposite of compression)
This concept is exaggerated in the following example:
"Reaching for a Dream" uses the same principle of contrapposto but creates more drama and movement by adding tension to the form. Notice how the body twists in the fore-mentioned spiral by the slight shift of the shoulders and hips out of alignment with each other but adds the arch to the back and the off-centered stretching of the body. Again, this is a simple standing figure but adding contrapposto and tension to the form give us movement.


IDEA THREE: Push the figure off balance. Even a static figure like this one of "Sweeney" can be made more interesting by pushing him off balance. In this case the figure leans forward while his razor holding hand is pulled back as if he is getting ready to swing his arm in a forward arc.You will notice the contrapposto of the body and the outstretched arm adds tension.


These same ideas can be applied to kneeling figures.


And ultimately applied to the most complex figure groupings.
I hope you find this information helpful or at least thought provoking.
Have a great day!
Mark
 

Tuesday, March 8, 2011

Working with tubing and wire

Some good questions have been asked about working with the brass tubing and wire so lets take a few moments to go over these before moving on.
I use 14 gauge galvanized wire; have done so for about 300 figures now with no issues of which I am aware. The 14g wire is rather sturdy on its own so smaller figures need no more support.
To bend the wire, it is best to use a pair of pliers. Grab the wire and turn your wrist to bend while pushing the wire against your free hand. If you have hand issues, grab the wire and bend while pushing against a firm surface.


This will give you a nice sharp bend.


For more support you can add a brass tube over the wire. the wire supports the tube's interior wall to help keep the tubing from folding and breaking.


For legs, the tubes are pushed all the way to the bend in the wire (this will end up in the upper chest).


The tubing is bent in the same manner as the wire being careful not to bend so far that you need to bend back to correct your bend. If you bend back, the tubing will likely crack and break.


Again, support the tube with your hand or a firm surface as you bend at the side of the pliers.


For the hip we want to bend at about a 45 degree angle from the upper wire.


The same process is used to bend the hip back to form the actual hip joint.


To bend beyond a 90 degree elbow, do a series of bends which are very close together. this will keep the tubing from folding and breaking.


In this manner, you can get tighter bends. The example shows the two bends with a space between then. As you bend, you can get them closer so you have a very tight bend for an elbow or knee.


The arch in the back can be bent in the same multi-bend manner. Use the pliers to support the point where you want to bend then push against a firm surface to bend the tubes and wires as needed.


Continue up the "spine" of the armature making a series of small bends to recreate the curve in the human spine.


 The finished lower armature has the correct bend for a spine with the hips spread apart ready to add padding.


A former student and good friend asked about an armature for holding an object; in her case it was a guitar. I like to add a series of control joints to the clay before curing if I know that the figure may need slight adjustment or "give" after curing and the clothing will cover these joints. Here I have taken a knife and cut the clay down to the wire armature at the shoulders and on one elbow. This lets the arm be reposed slightly at the end of dressing the figure.


Cuts from the rear.


A finished piece with control joints cut into the clay so the musical instrument can be eased into his hands without looking odd.
hope to see you next time, keep the questions coming and have a great day!