To those of you who are regular viewers, I offer a sincere apology for not posting new information. We are in the final weeks of our production of The Music Man and have missed almost two weeks of set construction due to snow so I must go in to the school during the day to get the set finished. I will try to keep posting new information but it is getting harder to sculpt right now.
Lets get to the teeth now.
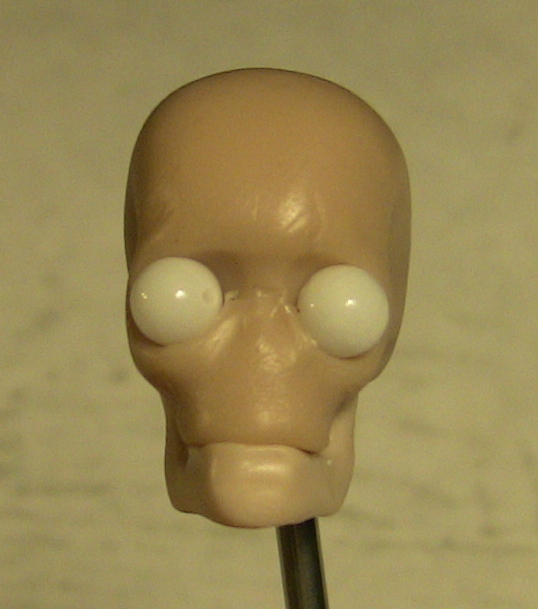
This is the cut-down jaw image we ended with last time. We should note the forward taper of the mouth area. On Mongoloid and Negroid skulls the mouth area may project even farther forward.
Please notice on the front view that the surface of the upper jaw aligns roughly with the center of the eye. This is where we will be applying the teeth.
To make a full tooth sculpt easier, I have removed the lower jaw.
Wet the bottom of the upper jaw area with liquid Sculpy.
Roll out a small tube of tooth clay. For teeth I use a mix of white and translucent clays.
Press the tube onto the bottom of the jaw area following the curve of the mouth.
Use a tool to pull the clay up onto the front of the tooth area keeping a flat front which follows the curve of the mouth.
The back of the teeth are sloped to the top of the mouth. Take a moment to cut the proper shape of the teeth. The rear teeth are wider and drop rather straight down from the jaw. The teeth become more tapered and angle away from the mouth as you go toward the front of the face.
Use a knife to score each tooth on the clay strip. Start in the center with the front teeth being sure the center line aligns with the center of the face.
Follow the rules of the teeth as you score them:
The adult mouth has 32 teeth -unless the wisdom teeth are pulled. 16 top, 16 bottom
The teeth are symmetrical - the same on each side.
The lower front teeth are slightly smaller than the upper incisors so they will fit slightly behind them when the mouth shuts - unless you are doing a character sculpture with odd teeth.
Teeth are numbered from 1-32 starting (as you are facing someone else's skull) on the left upper back molar. Notice the size and shape differences of the teeth. Molars are big and chunky (1-3, 14-19, 30-32), as you move forward the premolars (4,5,12,13, 20,21,28,29) are slightly smaller molar shaped teeth. The canines (6,11,22,27) are our fangs - for those vampire sculptors. They are narrower and kind of pointed. The incisors (6-11, 23-26) are shaped like chisels with the two upper front teeth (8,9) slightly wider than the other incisors.
Using these guides, we continue the scoring onto the inside of the mouth (please note that I have omitted the wisdom teeth so my mouth has only 28 teeth). I prefer to leave the teeth fused together for strength.
Use a small, flat tool to round the front surface of each tooth from side to side.
The teeth also taper from side to side toward the jaw.
The back of the teeth are rounded from side to side as well. Molars have an indentation in the top surface. Compare the right side teeth to the left side and you can see the roundness and depression in the molars compared to the rough teeth on the left.
Once these are finished, I prefer to cure the upper teeth so I can shape the lower teeth to the uppers without damaging the finished teeth.
The lower jaw is wet with liquid Sculpy and a roll of clay is applied. The teeth are tapered and shaped like the first few steps of the upper jaw. The lower jaw is pressed into the upper so the teeth will imprint the lower molars so they fit together. This image shows the lower jaw after pressing against the upper.
The teeth are scored and rounded like the top following the guidelines of the tooth model above.
While the jaws are apart, I have added the tongue. Finished teeth are cured and ready to attach the jaw to the skull.
The joint area is wet down with liquid Sculpy and a piece of clay is placed between the jaws.
* Note how the lower teeth fit behind the front teeth.
Align the jaw front to back and side to side.
The mouth is opened to whatever width you want for the sculpture.
Be sure the mouth is opened along an arc using the the jaw joint as the pivot for the lower jaw.
Cure the jaw joint.
You are ready to add the face on your shull.
Hope this is helpful. Have a great day!


Mark, I must say that you are an absolutely amazing artist, and an amazing teacher... you teach techniques so well....you are truly an inspiration. Thank you so much for yet another amazing tutorial. blessings, carla
ReplyDeleteI've seen sculpts with teeth before but this is first time I've seen how to do it, I thank you for this tutorial!
ReplyDeleteawesome..Thank you! :)
ReplyDeletewhat ratio of white to translucent do you use?
Complimenti per la tua bravura!!!
ReplyDeleteThank you so very much!!
ReplyDeleteThanks Mark, Im going ot have to try that with my next sculpture.
ReplyDeletePriceless information Mark!!! worth the wait!!! actually each post by you is so :)
ReplyDeleteDon't go feel guilty about not posting regularly, what you share is invaluable!!
I am planning on a laughing sculpture and this info is going to be extremely helpful :) Your kindness of sharing info has given me confidence to try my hands on it. I would not have dared without it.
Thank you. This is fantastic, and we all have life and understand if you don't post daily. I wanted to share that I made a fabric sculpt where I made sharp pointed teeth out of translucent clay for it. Translucent gives that natural tooth look. I didn't realise when I did this that this pack had another quality, until I passed it in the dark. It glows. Great for my fangy thing, but may not work for a human sculpt. Be sure to check the label..lol.
ReplyDeleteVery understandable if you can't post every day. I would feel blessed if you posted only once a week! So posting every day is awesome! I love the way you make your heads, how long does it take for you to sculpt the full head?
ReplyDeleteMark, i envy you working with a Theatre production, that use to be the highlight of my life when i volunteered with the technical crew or with the Theatre boosters to watch a theatre production come to life from the ground up, is so ~*MAGiCAL*~ !
ReplyDeleteHave FuN and thank you so much again for all of these priceless tips, will be emailing you tomorrow.
~JL (oh and your DVD's are priceLesS, ToO!)
Great tutorial! Thank you for sharing it.
ReplyDeleteKayC,
ReplyDeleteIt takes about two hours to sculpt a complete head but I am getting slower as my eyes and hands get older.
Anony,
I use a half and half mix of white and translucent clays but you will want to experiment with whatever brands you are using.
Thanks for sharing so much with us Mark ! You are an asset to the doll makers world !
ReplyDeleteClaudine
Wow, wow, wow, Mark! Amazing tutorial and exactly what I was hoping to learn from you. Now I feel gutsy enough to attempt this. The tut is wonderful. Thank you again and again. I'm sure the production will be fantastic because these students are so very lucky to have you helping them! You're so very kind to everyone!
ReplyDeleteGreat Tutorial! I was wondering if you can use liquid Sculpy on other brands of clay. I've never used liquid Sculpy before.
ReplyDeleteThank you again,
xxx
Morena
Liquid Sculpy should work with all polymer clays. Try a sample on your brand and see what it does before using on a finished work of art.
ReplyDeletefinally found a great skull tutorial. thank you very much :)
ReplyDeleteQue hermoso trabajo, cuanto talento! Dios continúe bendiciendo tus manos!!!!!!!!!!!
ReplyDeleteJust wanted to say, I work in a dental lab....I couldn't do better myself! Fantastic!!!!
ReplyDeleteI can't say anything that hasn't been said before of you.....but you are so generous & amazing to share you knowledge with us.....you are so deserving of your talent & success....thank you so much Mark!!
ReplyDeleteThanks for sharing your knowledge to the world.
ReplyDeleteHmm!! This blog is really cool, I’m so lucky that I have reached here and got this awesome information.Carrollton Tx dentist
ReplyDeleteMerci infiniment de partager votre savoir faire pour nous permettre d'explorer notre imagination toujours plus loin.
ReplyDeleteVous n'êtes pas que talentueux (j'admire votre travail!), vous êtes aussi très généreux.
Thanks for sharing this wonderful post. This was pretty amazing to see your great work. Have a wonderful rest of your day.
ReplyDeleteDentist Philadelphia
super cool sculpture i will have to show my dentist northeast philadelphia
ReplyDeleteThat's an incredibly detailed and valuable tutorial on sculpting anatomically correct teeth! The step-by-step guidance on creating the correct shape, alignment, and fusing the structure for strength is a true masterclass in structural detail.
ReplyDeleteSpeaking of structural integrity and lasting results, it's a great reminder of the importance of foundations in general. For anyone looking for the essential, permanent solution to protect their home's base from water damage and ensure its long-term health, a reliable waterproofing service is just as crucial as this level of detail is to your amazing sculptures.
Thanks for sharing your knowledge!
This was such an interesting and artistic take on “Teeth” — it’s amazing how something so ordinary can carry deep meaning when viewed creatively. At Leakfoe, we also value the strength behind everyday structures. Through our home waterproofing solutions, we help preserve the integrity of walls and interiors, ensuring that homes stay protected and beautiful for years to come. Loved the unique perspective shared here!
ReplyDelete