
SIZE - I have found that 14 gauge electric fence wire works well as an armature for most sizes of sculpture. I now sculpt most of my figures in the 10-14" size and this size wire works well as an armature without the need to twist wire or add extra support as long as you are doing a simple POSE.
SIMPLE ARMATURE
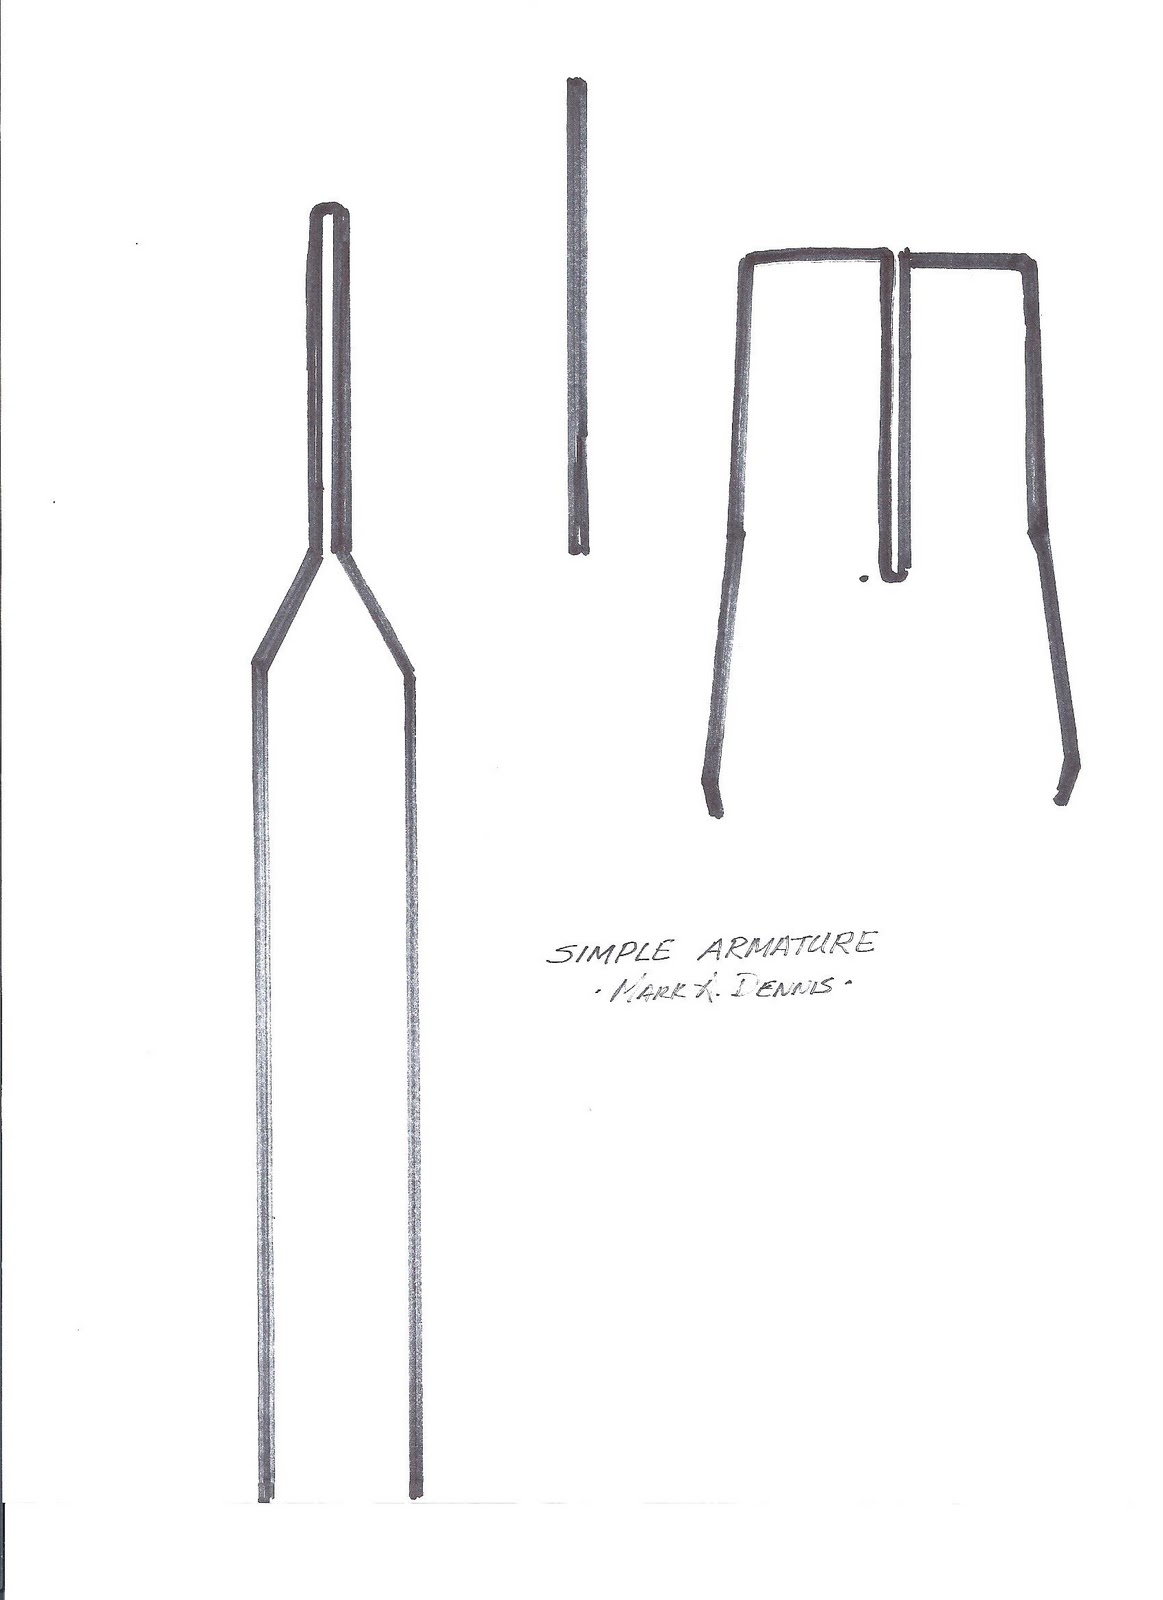
This is the outline of a simple 14 gauge armature. It consists of three parts which are foil taped together along the spine of the figure. This armature will hold most figures just fine until you start doing extreme poses or reach the 14" height. Please note that the leg wires will need to be longer to insert into a base.

THE AUGMENTED SIMPLE ARMATURE

 | This figure uses an augmented simple armature to add strength to the legs and hips. | ||||||

This figure is built on a simple wire armature. She is seated and has a soft cloth body so the only stress on the clay and the armature is in the head/chest area and the lower arms and legs. The simple armature can easily support the stress in these areas.

This figure is a good representation of a standing figure which would use a simple armature. He has a sculpted body but the body is then covered with a costume. He is about 14" tall so the simple armature will work just fine. The thing to keep in mind with this figure is that he may crack at the knees, hips, and shoulders from stress with an unsupported simple armature. To avoid this, he has control joints cut into his body at those points to allow the internal stress to be released at the joints rather than crack the figure. A control joint is much like the joint which masons place in sidewalks so the slab will crack in squares rather than a random pattern when it freezes and thaws. The control joints are then covered with the costuming.


Hope this answers a few questions and opens your minds to a lot more unanswered ones. Next time we will look at a more advanced armature.
Have a great day!
I am not sure at what point to ask this question but here seems good... Once I get the "simple armature" constructed, How does one get the clay to stick to it?? I am using Prosculpt. When I attempt to build up the clay on the metal wires/tubes, it just keeps twisting 'round and 'round... Frustrating to the point that I tossed it all aside...
ReplyDeleteTry wrapping another wire in a spiral around all of the armature parts giving you this trouble that should grip the clay and give you some stability.
DeleteThankyou so much Mark!!! this is most helpful :)
ReplyDeleteHello Mark, are you using galvanized wire?
ReplyDeleteThank you so much for this. Looking forward to more.
ReplyDeleteHello Mark, again thank you for taking YOUR time to help make a difference in our sculpting lives, it is appreciated more than you know!!I do have so many questions, please forgive me if they appear too sophomoric. First, is the foil tape the same as the metal tape used on a furnace/duct work? When you place the brass tubing over the 14 ga wire, can you get the precision you want in bending the limb? If you do not like the pose, can you bend it multiple times or does it pinch closed and then you have to replace the entire tube? So then, is there a reason you do not want to reinforce the entire armature with additional wires and just place the brass tubing in the hand and feet sculpts and then slip them over the extremity wires? Do the wires not pose better than wire and rod together? Last part of the question, are you then going to use the 14 ga wire as the insertion into the base? Then will you use tubing into the foot sculpt and slip it over that 14 ga wire? OMG is she finally done?? Does any of this make sense, or did I make it totally confusing. Thank you, Linda
ReplyDeleteI have the same concern as Linda, I find it difficult to get tubings and heavier wires to bend exactly where I want them. Usually the bends end up bigger than I want them too. If you can give any tricks and tips for this problem I will be most thankful to you!! :)
ReplyDeleteI will attempt to address the wire/tubing bending when we actually get to posing the armature. As for some of your other questions, lets see if I get this right.
ReplyDeleteFoil Tape- this is the same tape used for duct work...NOT DUCT TAPE but metal tape with adhesive on the back.
A quick note on bending tubing which Linda asked: If the tubing over the wire is a snug fit, you can bend the tubing without breaking the tube as the wire supports the inside and keeps it pinching and from cracking as you bend. Some adjustments can be made but you can never take a severe bend and re-bend it without snapping the tubing. Pinching of the tube is not an issue, however, cracking is.
Support in the rest of the figure: If you slip the tubing all the way up to the top bend in the wire before bending the hip joint as I stated in the text, You will have the following support in the torso: two 14G wires from the legs covered with tubing, two 14G wires from the arms, and one 14G wire from the neck. Just how much more support do you want in the rest of the body!:)
You can use the 14G wire to secure into the base if you have a small sculpture. You may want a tube on the end if going 10" or larger.
Finally, in answer to the question about posing being better without tubing; yes, it is easier to pose without the tubing so I recommend making smaller figures if you have an issue with bending and posing with tubing. I have made over three hundred sculptures by now in my ten years of sculpting in polymer clay and I don't find tubing to be an issue at all. If you do, simply work in a size which does not need the tubing.
Ok let me rephrase my question. Does using galvanized wire matter? I thought I read some where not to use it, but can't remember as it was about 5 years ago.
ReplyDeleteOnce I have my armature complete, I wrap the armature's metal wire with paper tape. I DO NOT like using floral tape...its slightly sticky and not very strong.
ReplyDeleteHope that helps!
MzSaTx
Hi Mark!You are a big artist,I like so much you art!!!
ReplyDeleteHello mate nicee blog
ReplyDelete