Sunday, April 17, 2011

Head (or other parts)Cracking Issues

In a previous posts, Fran asked about getting cracks in the finished head. After about 300 figures now, I have found that it is important to keep your clay covered with plastic after sculpting the face; or the rest of the figure for that matter. Polymer clay loses oils as it sits out in the open. The longer it sits around, the more crumbly and cracked the clay will become. I use a polymer clay skull under my faces which sucks even more oils out of the clay if it sits around too long.

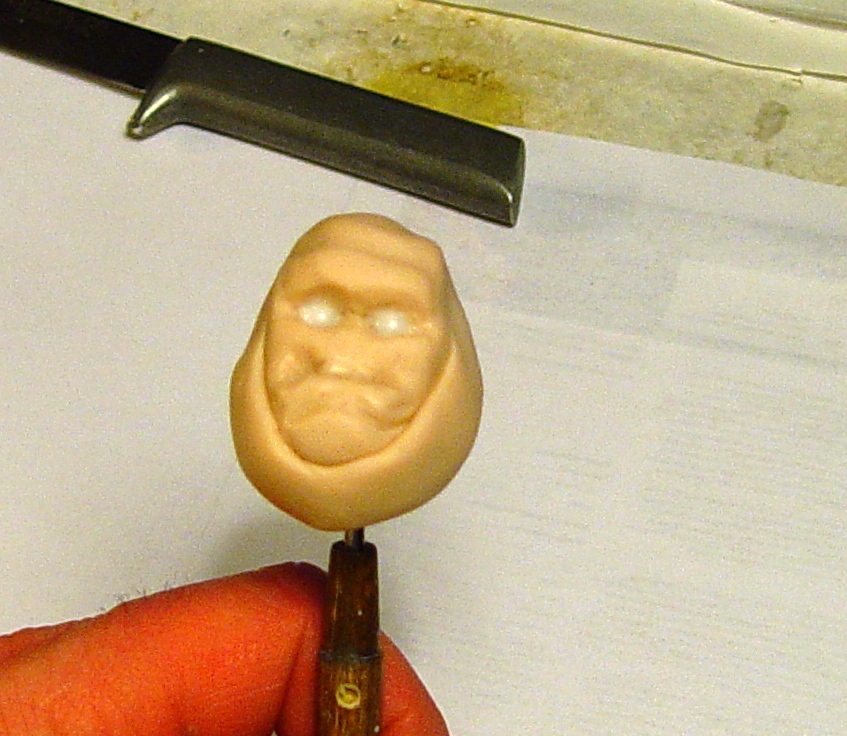
This head was sculpted then sat in a sealed baggie for about a month before curing. The entire backside of the head is covered in a pattern of cracks. In most cases, I would throw this out but the piece I am working on is going to be a bit dirty and unusual (for me anyway) so I can use the head with a few repairs. In fact, I want to give his face a scar so this will be fine to repair and use.
 The first step is to remove the square edges on the sides of the cracks by using a sharp blade to bevel each side.
A very thin coat of Liquid Sculpy is brushed into the crack and onto the surface of the head. This product puffs up as it cures so if you put too much in, the repair will rise above the surface of the skin and look like a raised scar. (Good to know if you want scars)


 The cracks are filled with clay.
The surface of the repair is blended into the surface of the head. The finished repair is cured with a heat gun.
The repaired head is attached to the body I made last night and is ready to go into the oven to cure.
The repair will show but they can be covered well with washes of color. This head was sculpted out of ProSculpt Caucasian clay and repaired with ProSculpt Baby clay so there will always be a difference in the color. Again, for this piece it will only add to the feel of the finished piece but for a pretty lady, I would start from scratch.


Generally, I prefer to sculpt a piece on the first day then let it sit overnight under a plastic bag to keep the oils in and the dog hair out. The second day I make changes to the piece and cure in the oven. This way my clay does not start to dry out so I help to minimize the chance of cracks.
Hope this helps. Have a great day!
Mark

Thursday, April 14, 2011

Child Armature

Now that I have the two heads made in proper proportion to each other, I can made the armature.

 We want start with a 5/32 brass tube which will be the outside of the support for the entire load-bearing portion of the sculpture. This tube runs from inside the base to the shoulder where the rod for the demon will insert into it.
Using my proportion chart with the armature drawn on it, I mark the bends on the tube and cut it off at the proper length on the bottom.
Inside this tube will be a brass support rod to stiffen the tubing and act as s top for the demon support rod. The support rod is cut about 3/4" shorter than the tube so the demon support rod can insert into the top of the tube by about 3/4".
This rod is a brass alloy welding rod which fits snugly inside the tube. Welding rods can be found at most home centers, or welding or farm supply stores.
 The rod is inserted into the tube and together they are bent to match the profile of the drawn armature.


 Here is the support tube/rod with another short length of 3/16 tubing over the bottom 1/2" so it will fit into my work base.
Using my demon drawing as my guide, I bend another length of the welding rod for the demon support.
This is the demon support placed into the tube/rod assembly.


 For now I will cut a 5/32 tube to length which fits into the hole in the demon skull and slides down over the support rod so I can see the height of the finished piece as I sculpt.
 This is the basic support system for the sculpture. The two body armatures will attach to the 5/32 tubing.
I now take a 14 gauge wire and bend it to create the torso and leg part of my child's body armature.


Another 14G wire is bent for the torso, shoulder, arm section of the armature.
The lower portion of the armature is attached with foil tape. You can solder these together to the tube if you want but the tape works just as well.
The torso portion of the upper body armature is overlapped on the lower section of armature and they are taped together as well. A short wire is inserted into the taped area to act as the neck.
Notice that the armature is attached in front of the demon support rod coming out of the shoulder so the rod can re pulled straight up and out of the tube.


The armature from the front shows how the child's body is tilted to give the feeling of movement to the figure.
 The armature is padded slightly with foil to bulk out the figure. We want about 1/4" of clay at any point on the finished figure.

The entire armature is wrapped in masking tape to keep oxidation from the wire, foil, and tubing from getting into the clay.


The finished child armature is ready to add clay...next time.
Sorry for the bad photos lately but my good camera needs to be repaired and I am using my old camera with focus issues.
Have a great day!
Mark

Wednesday, April 13, 2011

Child face

Before I work on the armature for the set of figures, I want to get my child's face roughed in as well to be sure my finished sizes of child and demon will work together.
Once again I will start with a smaller skull than my normal 12" figure uses and cut down the lower jaw to make it more child-like.
The child's skull is on the right. Notice the smaller lower jaw and increased cranium.


 The child's face follows the same steps as the demon.
Add a layer of clay to the forehead.
Cover the sides of the face with conditioned clay keeping the nose area thinner than the cheeks.


Wrap any extra clay around the bottom of the jaw.
 A small pyramid-shaped piece of clay is added to the nose area and seamed into the facial plane.
 The mouth indent is made below the nose.
On the child's face, the eyes are located about halfway down the face from the top of the head. The nose and mouth separate the lower half of the face from the eyes to the chin into thirds.

This is all the detailing we need for now. More will follow as the figure progresses and tells me what the finished face should look like.
Have a great day!
Mark

Monday, April 11, 2011

Demon head

Now that the rough layout work is done, I like to sculpt the faces next to get the proportion  of one figure to the other correct and so I have the character of the sculpture established. The character is important because it will dictate the adjustments I make to the poses as they progress. I find it is helpful to have the finished size of the head before I build the armature.
I start with a ball of clay which I will condition by kneading and rolling in my palms until it is soft and ready to apply to the skull.


 The clay ball is pressed into a pancake about 3/16" thick. The clay is properly conditioned if the sides of the pancake do not split as you are pressing the ball.
The clay is laid onto the forehead at the tops of the eyes.


 Another pancake of clay is added to each side of the face being careful not to cover the upper lip/nose area with too much clay. The extra clay is worked around the eyeball. Applying the clay in sheets like this will let your final face follow the topography of the underlying skull so you have less work to do to make it look natural.
 The clay is applied to the rest of the face. Notice how the covered face looks like the starting skull.
This critter is slightly on the larger side so I add a layer of clay around the outsides of the face. As we gain weight, the skull stays the same size but a layer of fat builds up under the skin on the extreme outsides and bottom of the face.


 The nose is applied and rough shaping starts on the entire face.
The final character of the face is starting to show as folds and bulky areas are stressed in the face. Keep in mind that folds in skin are rounded on all edges. Do not use a sharp tool and just cut "V" shaped notches in your clay for a fold.


 The mouth is opened slightly for his thumb. All rough sculpting is done now.

Final skin texture  for an old face is done by first adding crisscrossing fine lines over the entire surface of the finished face. These cross in a diamond pattern just like your own skin. Sorry, these are hard to see on this image.

The next step in skin texture is to stipple the skin with a stiff brush. The long fibers of the brush can get into all the nooks and crannies to add pores to the skin. Some areas get stippled harder than others such as the tip of the nose and the beard area for the face since you are dealing with both pores and hair follicles.


 The clay for the ears will need to have some more bend to it than my normal clay so I will use Sculpy Bake and Bend clay added to my ProSculpt. This will let the ears take a bit more abuse in shipping. The color match will be off slightly but since he will be stained with washes, I can adjust the final color just fine. I have used a mix of 15 parts white, 4 parts, yellow, and 1 part red. This is blended into a pinkish mix then mixed 1:1 with ProSculpt Baby clay. The mix will take repeated bending now.
The ears are roughed in before attaching to the head.
Ears are seamed into the head being sure that they are well attached.
Teeth are added using a 1:1 mix of white and translucent polymer clays.

The horns are just straight white Bake and Bend clay so they will not break in the future. They are shaped and detailed before securing into the head clay.
The finished head. You can see the crisscrossing and stippling in this image rather well. Also notice the slightly more pink coloring to the ears.
We will sculpt the child's head next time.
Have a great day!
Mark

Saturday, April 9, 2011

"Demon" Prep Work

** Please remember that you are welcome to sculpt along but please alter your sculture so we are all making something unique. Thank you!

Lets look at scale, proportion, and the armature layout today.
 I want to use an eight year old child for this sculpture. the best way to find proportions for any age is to use an actual model. I have taken a photo of an eight year old child, and measured the lengths of the body parts then adjusted to a simple proportion chart which I can use for my own sculptures.
Using the head as my measurement, the torso is three heads high from crown to crotch. (1 head to chin, 2 heads to bottom of sternum, 3 heads to front of crotch - backside is slightly lower) The knee is one head down from the crotch however, keep in mind that the length of the upper leg is actually from the hip joint (see + sign) to the knee which is about 1.25 head height. The lower leg is also 1.25 head height from knee to ankle. Please note that this is a guide line I have established for myself from actual people. You may like a different set of proportions so go for it!

 Now that I have a proportion chart for the child, I need to decide what size he will be. I draw a few different sized figures and come up with the one on the left as my choice. He or she will be about 6" tall. Smaller = cute. This sketch is the actual size of my finished piece.
I will start this sculpt with a face so first I need a skull. The skull on the left is my standard adult skull. The one on the right has been altered for a child's head. The upper part of the skull is made slightly larger so the eyes sit about halfway down the face.The sides and bottom of the jaw are cut down so the lower jaw is smaller. The eyes are the same size bead so they will look bigger in the small face. Big eyes =cute.
The changes to the adult skull from the side. Note the larger cranium and smaller jaw as you compare the two skulls.
For details on creating a skull, please see my earlier post on sculpting the skull.


Here I have drawn my demon to the relative size I want for my finished piece. I want him larger than my child but not too over-powering. Also keep in mind the weight of the finished demon needs to be supported by one thin rod.
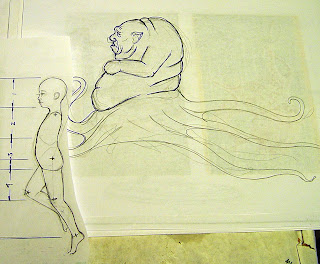

Once I have the final size of the demon, I can make his skull as well.
 His skull is simply a variation of the basic adult skull which I use for most of my sculptures. I have added more clay to the eyebrow, the cheeks, and the jaw.
 The lower jaw has clay added to the front to create an under-bite. It also has two sockets created so his fangs will fit into the jaw when done.
 The skull sized to the demon.

I use a very rough sketch to layout the load-bearing parts of the sculpture. This lets me simplify the sculpture into just the basics needed to support the weight of the demon and transfer the stress into the base.

 Now I can transfer my rough armature ideas into an actual armature layout on my sketch.
The body of the figure will be supported by my simple 14gauge wire armature (blue). The body will separate at the waist with the Octopus part of the figure staying attached to the support rod (red) to make shipping easier. The tentacles will be made of flexible clay over 18 gauge aluminum wires which will be attached to the rod.
This rod will insert into a brass tubing socket in the child's armature and into a brass tubing socket in the waist of the figure.
The child will be built in a similar manner: the body is supported by a simple 14G wire armature (blue), the lower leg and spine will have a solid rod running from the shoulder to the base (red), and the shoulder will have a socket connected to the lower rod into which the demon's support rod will insert.


I hope I have explained the design well so far. Next time we will start making the armature. Please feel free to email me with photos and questions if you need help (madsculptor@verizon.net). I will post again on Monday so you have time to design and layout your armatures before we continue. If you need more time, let me know and we will attempt to adjust to the majority of those following along.
Have a great day!
Mark

Friday, April 8, 2011

HERE WE GO!

Well, only got 19 responses from  300+ followers so we will use some of those ideas for the next sculpture. Thanks to those who suggested things; some a bit odd, some intriguing.
Here it is:
This is my design for a piece I like to call "Exercise Your Demon". It shows that most scary things seem silly when taken out into the open. (Homage to my wife the psychotherapist)
So here is what we will be addressing from your list of wants:
1. A small child in action (we will look at the proportions of the child). We will also cover putting clothes on a full figure sculpt.
2. An armature for a more complex set of figures where the largest figure seems to have little support.
3. More expressive faces.
4. A hybrid creature- in this case a sumo wrestler and an octopus.
5. Tentacles and how to get them to not break for shipping.
6. Sculpting a "nightmare".
7. Maybe we can add a tattoo to the critter just because you asked so nicely.

Sorry that we won't be getting to the Equine hybrid for those who asked. Good idea, maybe later this year.
This is the rough design. Hopefully the final piece will flow a little better. I definitely do better with sculpture than I do sketches.
We will start next time with laying out and creating the armature for this piece.
Have a great day!
Mark