
Sorry it has been awhile since I posted but the set and directing of Dracula is taking much of my free time. Here is what has happened since last we spoke (well, I wrote, you read).
 I started by enlarging the sketch of my figure to the actual size of the finished piece based on the size head I will be using.
 I have decided to build up my support rod with steel and brass (so I can solder to the brass later if needed) rather than using a larger diameter steel rod. I am using a 5/32" steel rod which is covered by a 3/16" brass tube which, in turn, is covered with a 7/32" brass tube. If you look at the picture you can see how the rod and tubes will align inside the leg. The rod will stop about 1" short of the brass tubing at the socket in the thigh. This way the upper armature can slip into the brass sockets of the leg.
 I slip them together and bend the support assembly following my pattern.
 I keep bending and shaping the support assembly.
 Next I draw the size of the finished rabbit so I can get my support assembly bent and cut to fit the final sculpture.
 The same process is used to create the support assembly for the upper body with the exception that the steel rod is 1" longer on the bottom than the brass so it will insert into the lower assembly.
A 14 gauge wire armature is bent and cut as if I was making a simple wire body armature. The free hanging leg gets a brass tube slipped over it for strength while the supported side is cut to the length of the separation point of the armature.
 The body armature is bent to the pattern.
 The armature is foil taped together.
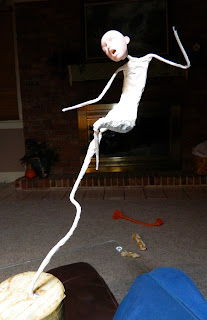
 The final structure of the armature is ready for padding. Please note the assorted dog toys on the floor. Can you say "spoiled dog"?
 The body is padded with foil so the clay will be about 3/8" think when finished.
 The armature is wrapped in masking tape to keep the clay cleaner while the body is being created.
That's it for today! Have a great day!
Mark


A 14 gauge wire armature is bent and cut as if I was making a simple wire body armature. The free hanging leg gets a brass tube slipped over it for strength while the supported side is cut to the length of the separation point of the armature.


 The armature is wrapped in masking tape to keep the clay cleaner while the body is being created.
That's it for today! Have a great day!
Mark
Thank you Mark!!! You are an awesome teacher.
ReplyDeletelove seeing your process!
ReplyDeleteGlad you are back! Thank you for sharing. Aren't all pets supposed to be spoiled? :D
ReplyDeleteit's great to see Alice begin to come to life! I love knowing the mechanics of your armatures..it is simply amazing the movement you are able to incorporate into your pieces..fantastic Mark! Thanks for sharing have a great week. Christel Hutson
ReplyDeleteThank you for showing so many steps in the process.
ReplyDeleteCompletely in awe again, hope all goes well with the play. Have FuN, LuCkY puppy!
~JL
I can't wait to see this finished. Your work is amazing.
ReplyDeleteCheers!
LuLu Kellogg
Hi Mark!
ReplyDeleteJust wanted to say that I'm super glad I stumbled across this blog. I'm not a beginner, but your creations have definitely got me thinking about how I can make my own art dolls more dynamic. Casually sitting/reclining dolls seem so BORING now, compared to your sculpts! :P
Random question, have you experimented with using TLS on your creations as "skin"? I know you coated the skin of your demon sculpt with TLS, but how does it look just on normal women/men? I like the idea of the paint being sealed a bit more permanently, but have no idea whether it would look good. Too scared to try it on a finished sculpt in case it looks wrong. :P
Thanks again for your awesome blog!