
Thought we would take a little more time to go into more depth on how to make some of the basic things which we all take for granted. I have been asked a few times how to make these wings so here goes.


I transferred the measurements from this first wing onto a piece of paper so I could get the size roughly the same.

A folded piece of thin leather is cut as the support for the wire which will be inside it and the feathers which will cover it. This s the sized to fit in the areas covered by the primary coverts, secondary coverts and the marginal coverts (see above diagram)
 A 14 gauge wire is bent to fit inside the leather with about 3/4" sticking out the end to insert into the figure.
 The wire is glued along the fold of the leather with Fabri-tac glue.
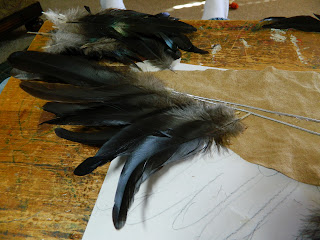
 I purchase my feathers at Plumes N Feathers . These are coque (rooster) feathers which are naturally bronze and show bronze, green, and black when dyed.
The feathers are sorted by shape and size.
Many feathers are going to have a directional shape to them meaning that they belong on the left or right side of the bird. Use this same determination when arranging feathers on your wings.
 Once the feathers are sorted and arranged, a layer of glue is applied to the open leather and the first row of primary and secondary feathers are placed into the glue starting with the tips of the wing and heading toward the body.
 ***The diagram above is drawn from the top of the wing. As you look at the top of a wing, each feather lays under the previous feather (for support and sealing the wing against air infiltration) from the tip of the wing to the body of the bird. When you attach the feathers following the same direction, each feather will overlap the previous feather in the same manner.
 First row is done.
 The leather is now folder over and glued down over the ends of the first row of feathers.
 Coverts are now glued in place starting from the outside of the wing and heading toward the body.
 Marginal coverts are installed the same way using shorter feathers which are just the tips cut off a feather.
 Both top and bottom sides are done. Be sure to flip the feathers over when installing the bottom coverts so the feather is concave (curved in) on the underside and convex (curved out) on the top side.
Smaller trimmed feathers are used to cover the edge of the wing starting at the Alula and working toward the body.
 The finished wing top.
 And bottom.
 The wing is inserted into the body by drilling two holes in the torso at a downward angle where the wires stick out of the wing. The wires are then bent down slightly so they will not work their way out of the torso as they are displayed. The wing is shaped by bending the wire inside the wing. Do this while the glue is still setting so you can shift the feathers slightly to cover any holes in your feather pattern. You can add more cover feathers if gaps develop while shaping the wing.
Using black leather would be a good idea so the support is less likely to show. I was out of black this day!


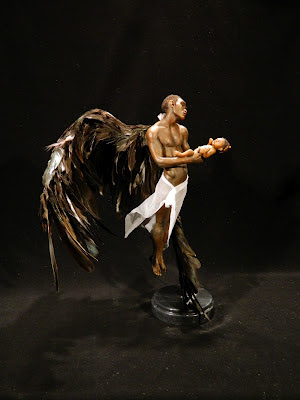 The finished piece.
Have a great day!
Mark

This diagram shows the feather layout of a bird's wing.
Using this diagram, I built the first wing for this figure over the support rod which elevated the figures above the base.


I transferred the measurements from this first wing onto a piece of paper so I could get the size roughly the same.

A folded piece of thin leather is cut as the support for the wire which will be inside it and the feathers which will cover it. This s the sized to fit in the areas covered by the primary coverts, secondary coverts and the marginal coverts (see above diagram)


The feathers are sorted by shape and size.
Many feathers are going to have a directional shape to them meaning that they belong on the left or right side of the bird. Use this same determination when arranging feathers on your wings.


Smaller trimmed feathers are used to cover the edge of the wing starting at the Alula and working toward the body.


Using black leather would be a good idea so the support is less likely to show. I was out of black this day!


Have a great day!
Mark


