Since the last post, I have pretty well finished the sculpting of the mermaid. Since this is straightforward sculpting, I will not bother posting the steps but will move on to the male figure.
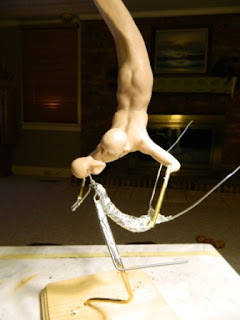
The first step in this is to make another wire armature and pose it to match my sketch.I have decided to use a solid rod instead of a flat piece of bronze for the kelp support since most of you will not want to take time to learn brazing to work along. The rod in this case is 3/16" diameter and is from my local Lowe's Home Improvement Store. The rod is bent to follow the wire armature with the end turned up to accept the tube from the mermaid's hand. I have altered the position of the hand connection in my original drawing so she will be touching him on the abdomen rather than the chest.
The rod in place and ready to secure to the armature.
The rod is simply foil-taped onto the armature at a number of locations.
From the feet looking forward.
A tube of 7/16" brass is cut and slides over the end of the rod. this is the connector for the mermaid's arm which will be crimped onto the mermaid and will be free to slide off the support rod.
The arm of the mermaid slides into the extension tube we just placed on the support rod and is crimped onto the arm with a pair of pliers.
This will give you some idea of how the support system is working
I like the fact that she is so far off the support rod at the point of contact at his elbow. It makes them look like they are floating- I hope.
Here is the next fix that I came across as I worked. She was twisting around the support rod too much so I decided she needed to have the other hand attached to him as well. I bent a small 5/16" tube at an angle and foil-tapped it to the upper arm of the male. The female arm is bent at the same angle as the left (support) arm so they can just pull up and out of the sockets for removal.
This created a different issue. The mermaid now was pushing the sailor's arm down and adding stress to his shoulder so it would have cracked later. Onto the next change!
I fixed this issue by adding two 5/16 rods to the shoulder/ torso area. the first was run across the shoulder form elbow to elbow.
The second rod was run from the elbow to the hip along the side of the torso. They are foil-taped in place and covered with masking tape.
As you can see, these additions allow the mermaid to hang out in space very nicely.
Next time we will look at making fins and scales.
Have a great day!
Mark


Always amazed at the way your mind works, most of us wouldn't have even attempted this, let alone come up with the fixes. A fabulous learning experience for the rest of us. As always, Thankyou Mark!
ReplyDeleteI think it looks awesome so far, and I can't want to see how you add fins and scales. I've never attempted a mermaid this scale before, so I can't wait to see how its done:)
ReplyDeleteI love this piece very much ! I am so grateful on how you share your knowledges and techniques with every body. I have learned so much from you and I keep on learning new things every day.
ReplyDeleteThank you !!!
Claudine
thank you very much, I learned something new today.
ReplyDeleteMarisa :)
Cool Mark! I love to share with us how your doing. Thank you so much! <3
ReplyDelete