Sunday, July 31, 2011

Armature second figure

These figures will be independent of each other so there is no special armature needed. I photographed these as a step by step so you can review the armature without going all the way back to another, older post.

 The armature consists of three 14 gauge wires. The first of which is about 20" long and is bent at the half-way point for the legs. The second wire is about 18" long and bent at the middle as well. This is the arm wire. This figure will be about 12" tall when complete.
A 5/32 brass tube is slide up each leg wire to add rigidity to the sculpture.
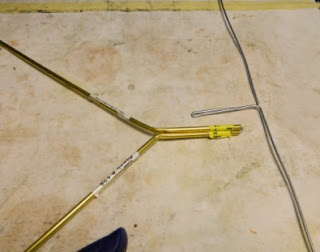
 45 degree bends are made in the lower armature at the waist. The upper armature is bent at the point where the neck will emerge.
Additional bends are made at the hip joint (not the hip bone) and at the shoulder.
An additional wire is added down the spine. This will support the head. The three parts are wrapped tightly with foil tape.
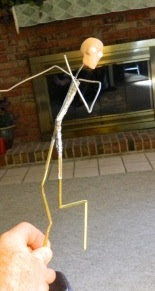
 The wire and tube part of the armature is done. Note that the legs are bent for a digitgrade (animal which walks on its toes: wolf, dog, etc...) animal's joints.
 The figure is padded out with foil. We want about 3/8" of clay over the foil as we sculpt so you need to bulk out enough to fill the torso.
 Legs get bulked out to the knee joint.
 Everything gets covered in tape to keep the oxidation from transferring to the clay.
 The finished armature,

The figures are posed together so we can adjust the drama of the moment.
 Next we will do a little face work.
Have a great day!
Mark

Thursday, July 28, 2011

Red Riding Hood?

Hi, starting a new piece which is mostly likely to become Red Riding hood.
Giving a slightly more menacing twist to it. Maybe change the feel (costuming) to more Gothic or middle earth? Who knows where it will end up? Decided to keep the armatures simple for awhile.


 Flipped the pose to a mirror image for starters.  But here is the armature. Basic wire with tubing on legs. Foil body and wrapped with tape.

I'll keep ya posted!
Mark

The Chase

Hi there, Wanted to share this piece with those of you who do not get to Facebook. Really, there are those of you who haven't joined the Facebook craze? This piece is an experiment in making translucent wings. Not at all how the concept started but she turned out rather well, I think.

 The project started as a test to make a textured, translucent bat wing. I have made these out of nylon before but wanted a different "look".
Recently as I was working on the roof I disturbed a bat and was able to watch it fly away from a great vantage point. I noticed that the wing membranes were not flat during the downward stroke but had a slight arc to them as they pushed against the air. I decided to recreate this and even exaggerate that arc. Here are the wings. The left one has not been colored while the right has a layer of coloring baked onto the surface. 
I am pleased with the translucency of the wing. I guess I should tell you that it is made with Translucent Liquid Sculpy. I will do another sculpt with wings, maybe a dragon (?) and show the steps I used to make them if there is interest out there.
Once the wings were made, I had to back-engineer the armature for the figure. Once again, I decided to try something new and work more expression into the face. 
 This is the final form which these experiments have taken.
 The tree is an actual tree branch to which I have added clay to change the shape of the base. I matched the bark of the real tree and then the colors  as well.

 Next I added the moth. It is again made of TLS  for the wings. Maybe a tutorial there if anyone is interested?
 the moth is supported by a wire running from the leading edge of the wing into the back for her hand. The body is clay with flocking and feathers for antennae.
The finished piece.Thanks for tuning in! Have a great day, Mark

Sunday, July 24, 2011

Leather Boots

Thanks for hanging around while I was gone. I am going to try to get back to posting a few times each week. I wanted to share the leather boot crafting with you, we've done this before but here it is again.
 Start with a pattern made to fit your figure so you can play with the style and shape of the boot. I prefer to just jump in and work directly so here goes. The body of the boot or shoe will look best if made of a thinner grade of leather - in this case, I use glove grade leather which is thinner than "standard" sewing leather. The main parts of the boot are cut with an extra 1/8" allowance on the inner and outer edges so they can be turned under. The darker top is the same leather but with the suede side up.
 The body of the boot is glued onto the leg with Fabri-tac. Each side is turned under and butted against each other as they are glued down. Once the fronts set, the same thing is done in the back of the boot.
 The cuff of the boot has the allowances turned under and glued down with Fabric-tac. The cuff is then slipped under the top of the boot body and glued. Fabric-tac works well when gluing the rough side of leather to itself or to the clay. Super glue is better when gluing any smooth side of the leather
The cuff is turned down so the smooth side is now up. The back opening will be laced.
 
Small strips of leather are added to reenforce the sides, heel, and box of the toe, Thicker carving leather is used for the sole and heel of the boot. the sole is attached with super glue. After it has set, the sides of the sole leather are soaked with super glue to seal the edges. The soles can then be sanded and distressed because the leather will be very firm.


I have made myself a leather stitching tool using a cheap wood burner from the craft store.


 The tip was a small round pin which I have ground into a sharp wedge and then shaped an inward curve into the edge with a file.
The tool is comfortable for my larger hands and works well to burn the stitching into the leather. If you look closely, you can see the stitching in the sole of the other boot at the top of the photo.
The stitching is complete and they are now ready for aging and distressing.
Thanks for dropping by. Have a great day!
Mark

Friday, July 22, 2011

Sailor pants

Hi all! Have not been in the mood to sculpt lately so I have been working on the house and the long "honey do" list. However, I did sit down the other day and work on the sailor's pants so here is the step-by-step on them.

 I have chosen a pair of old silk shorts for the material for my sailor pants.
 I cut a chunk off the side of the shorts which is already seamed together. This will become my side seam on the pants so the wear patterns are already in the cloth.
**A little side note here. When I sculpted the mermaid's hand I slipped a thin wedge of powdered clay under the  fingers so there would be room to put material between the hand and his torso.
 This lets me insert the material without adding stress to the fingers.
The side of the shorts are cut to fit the front and back of the pants. The pants are slightly over-sized so they will be baggy on the figure. The leg seams, front seam, and back seams are stitched together before they go on the figure.
 I use a piece of the hem from the shorts bottom to make my waistband of the pants since it is already pressed and has wear on the edge.
Okay, strange photo! I want the pants to have the look of clothing underwater. When clothes get wet and the body is in motion, the clothing sticks to the body more than it would out of water. To get that look  I cover the skin with Fabri-tac then lay the cloth on the skin and form the wrinkles in the cloth as I work.
 The same technique is used as I position the pants on the legs. Here you can see the left pant leg is glued to the figure whereas the right has not been glued yet.
 The pants are "wrinkled" all over.
The bottom of the pant legs are glued in place. they will be covered by the bucket boots.
 I run a very badly stitched seam along the waistband (want it to look like very cheap stitching) and glue the band around the figure to cover the top of the pants fabric. The material is kept away from the rod for the mermaid and is glued tightly so it cannot get caught in the tube as they come together.
A drop flap is attached over the front seam of the pants. Buttons will be added later.
 Next time I will show the leather boot assembly.
Have a great day!
Mark

Wednesday, July 6, 2011

Scale painting


Here is a quick step by step of how the scales on the mermaid are painted.


I used my scale tool to create a sample.
I will be using Perfect Pearls embossing powder to color the tail. (Got them at AC Moores)
I want a green/gold surface so I started with a covering of gold brushed onto the raw clay.
Completed gold on the surface.
The green is brushed from the bottom of the scales upward so the green is deposited in the cut under each scale.
 I want the clay color to show so I wipe the scales from top to bottom forcing some powder into the clay surface and removing the excess. The amount of pressure applied will determine how much powder is left in each scale.
 This image shows the wiped surface on the right side  and the original powdered surface on the left.
I added and baked a layer of Translucent Liquid Sculpy on the right side to smooth the transition from scale to scale. This is not needed but I liked the look as it smooths the scales down to look more "fish-skinned"


Looking up from the bottom of the scales to compare the right side with TLS and the left without TLS.


The mermaid skin is washed in a mix of Adobe Red Acrylic and Extender then wiped down.
The sailor has a combination of two washes: Raw Umber/retarder and Adobe Red/retarder.


 Thanks for taking a look. Have a great day!
Mark